 Try ShortPoint now
If you're looking to bring your SharePoint data (SharePoint lists, SharePoint calendars, or document libraries) to your SharePoint sites, the Current Site connection type is your go-to solution! It's one of the most straightforward ways to display dynamic content, and once you get the hang of it, you'll wonder how you ever managed without it.

TABLE OF CONTENTS
- Prerequisites
- What is the Current Site Connection Type?
- Interactive Tutorial
- Step-by-step Tutorial
- Current Site Connection Features
- Practical Use Cases
- Create Dynamic Content with the Current Site Connection
- Frequently Asked Questions
- Do I need special permissions to use the Current Site connection?
- Can I control how many items are displayed?
- What if I have custom views set up in my SharePoint list?
- Do I have to use this connection type for every page?
- Will my SharePoint list properties be preserved?
- Can I use this with any ShortPoint design element?
- What happens if someone deletes an item from the source list?
- Can I customize which fields from my list are displayed?
- How do I know if the connection is working?
- Do I need to reconnect every time I make changes to my SharePoint list?
- How do I manage permissions when connecting to SharePoint data using the Current Site connection?
- What happens if the source file is moved or renamed in SharePoint?
- Can I connect to multiple SharePoint lists or libraries on the same page?
Prerequisites
- You have the latest version of ShortPoint SPFx (version 8.7.20 and up) installed on your SharePoint environment.
- You are a ShortPoint Designer with an active license.
- You must have the ShortPoint Design Element you want to use to connect to your SharePoint page.
- You must have access to the SharePoint List / Library / Calendar you want to connect to.
What is the Current Site Connection Type?
The Current Site connection type enables you to connect ShortPoint elements to SharePoint data assets located on the same SharePoint site.

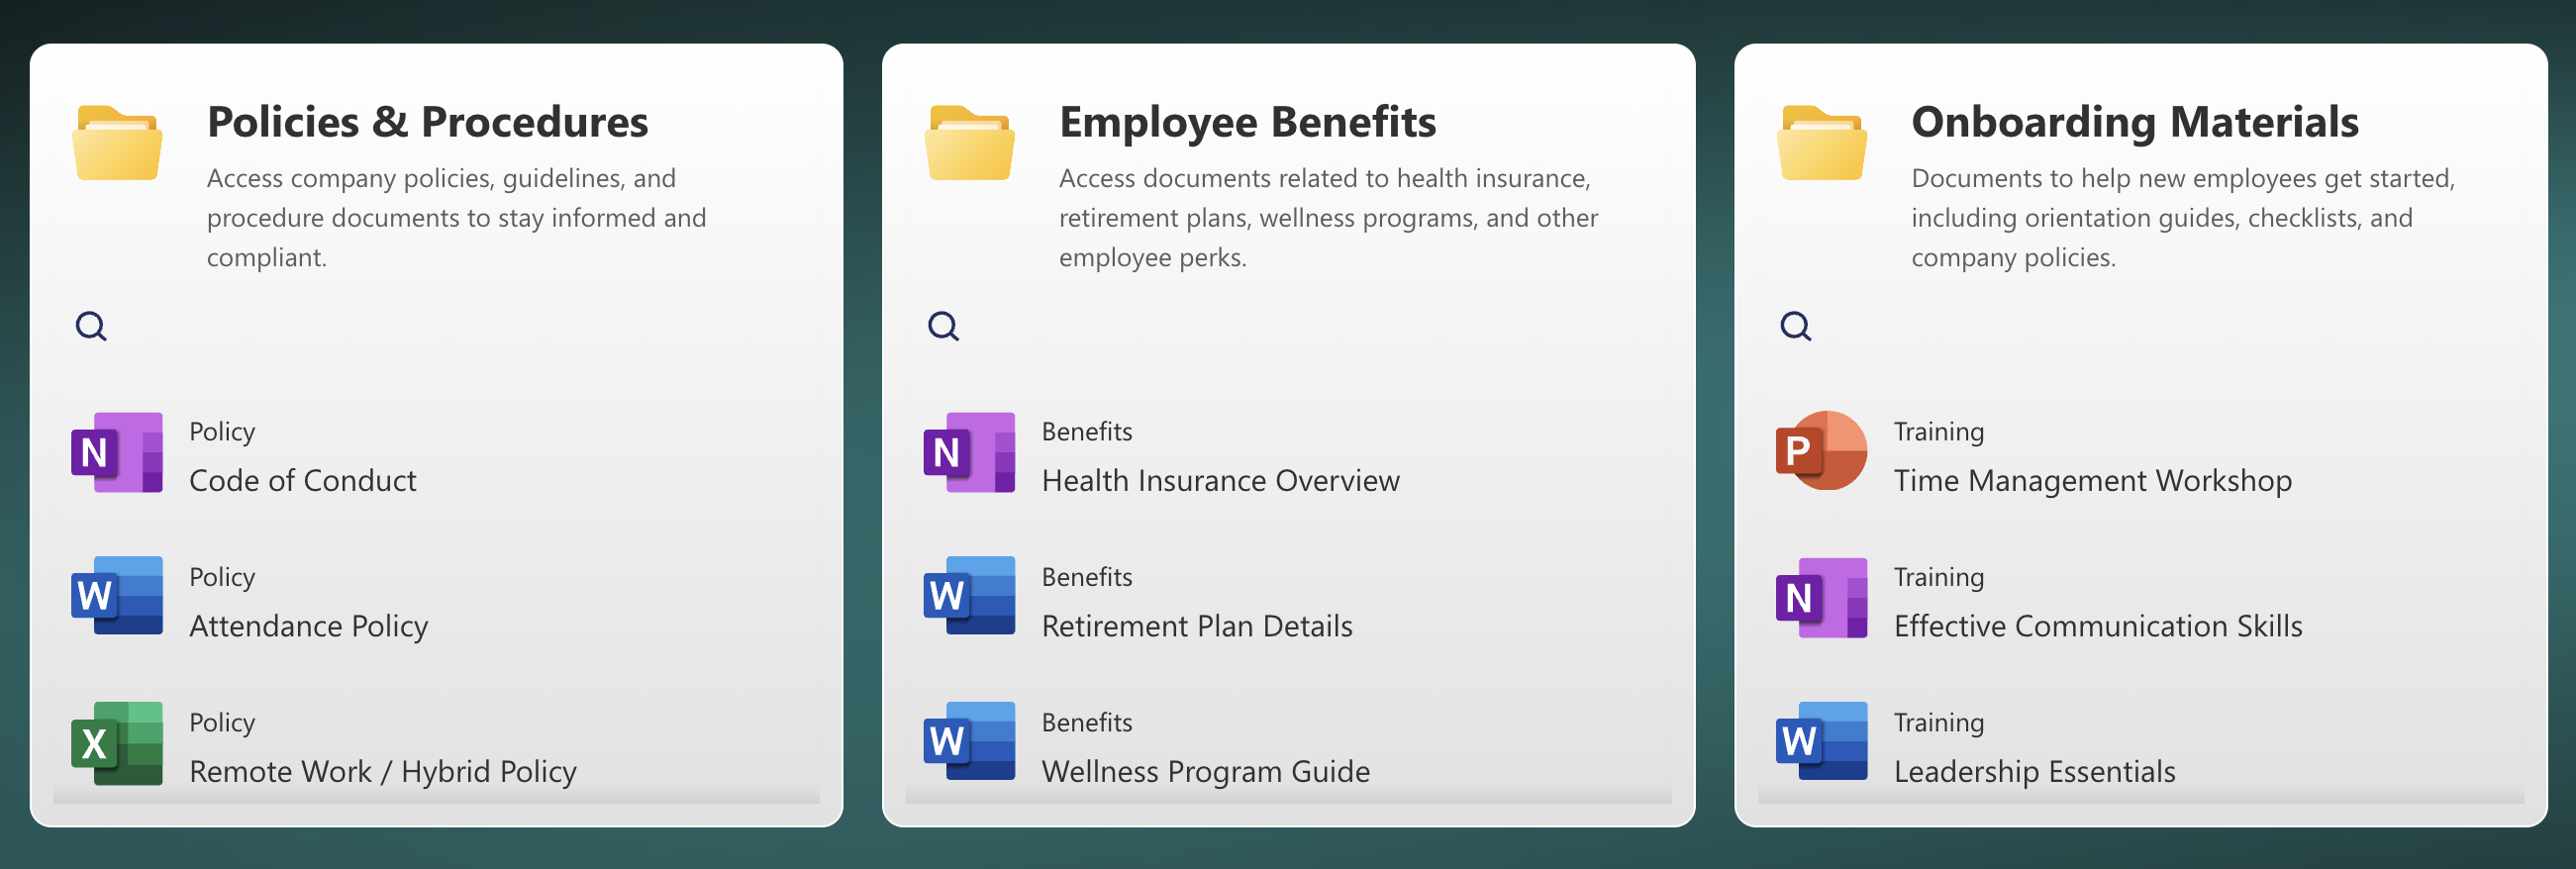
Instead of manually copying and pasting information or maintaining duplicate content, the Current Site connection creates a live link to your SharePoint lists, libraries, calendars, or announcements. It's particularly useful when you're working within a single site collection and want to showcase data that already exists in your SharePoint environment. Just take a look at this SharePoint List we created:

With the Current Site connection, all the information inside the list is now displayed in your SharePoint site. The best part? It's not only informative but also visually appealing.

And when someone updates the source file data in SharePoint, those changes automatically appear in your ShortPoint Design Element. No extra work required on your end.

Interactive Tutorial
Click Get Started to learn how to use the Current Site connection type:
NOTETo learn more about the Connect Feature and Items Mapping, check out Basic Tutorial: How to Establish Seamless SharePoint Connection with ShortPoint Connect.
Step-by-step Tutorial
Learn how to use the Current Site connection type to connect to your SharePoint data located in your current SharePoint site:
Step 1: Edit the ShortPoint web part
- Go to the SharePoint page you want to use and click Edit:

- Close the Toolbox:

- Edit the ShortPoint web part:

Step 2: Edit the Design Element
NOTEBefore proceeding, you must already have the Design Element you want to use to connect on your SharePoint page. You can use any Design Element you prefer, but we recommend using Design Elements that allow listing of multiple items, including Simple List, Image List, Icon List, and so much more. For this guide, we'll use Icon List.
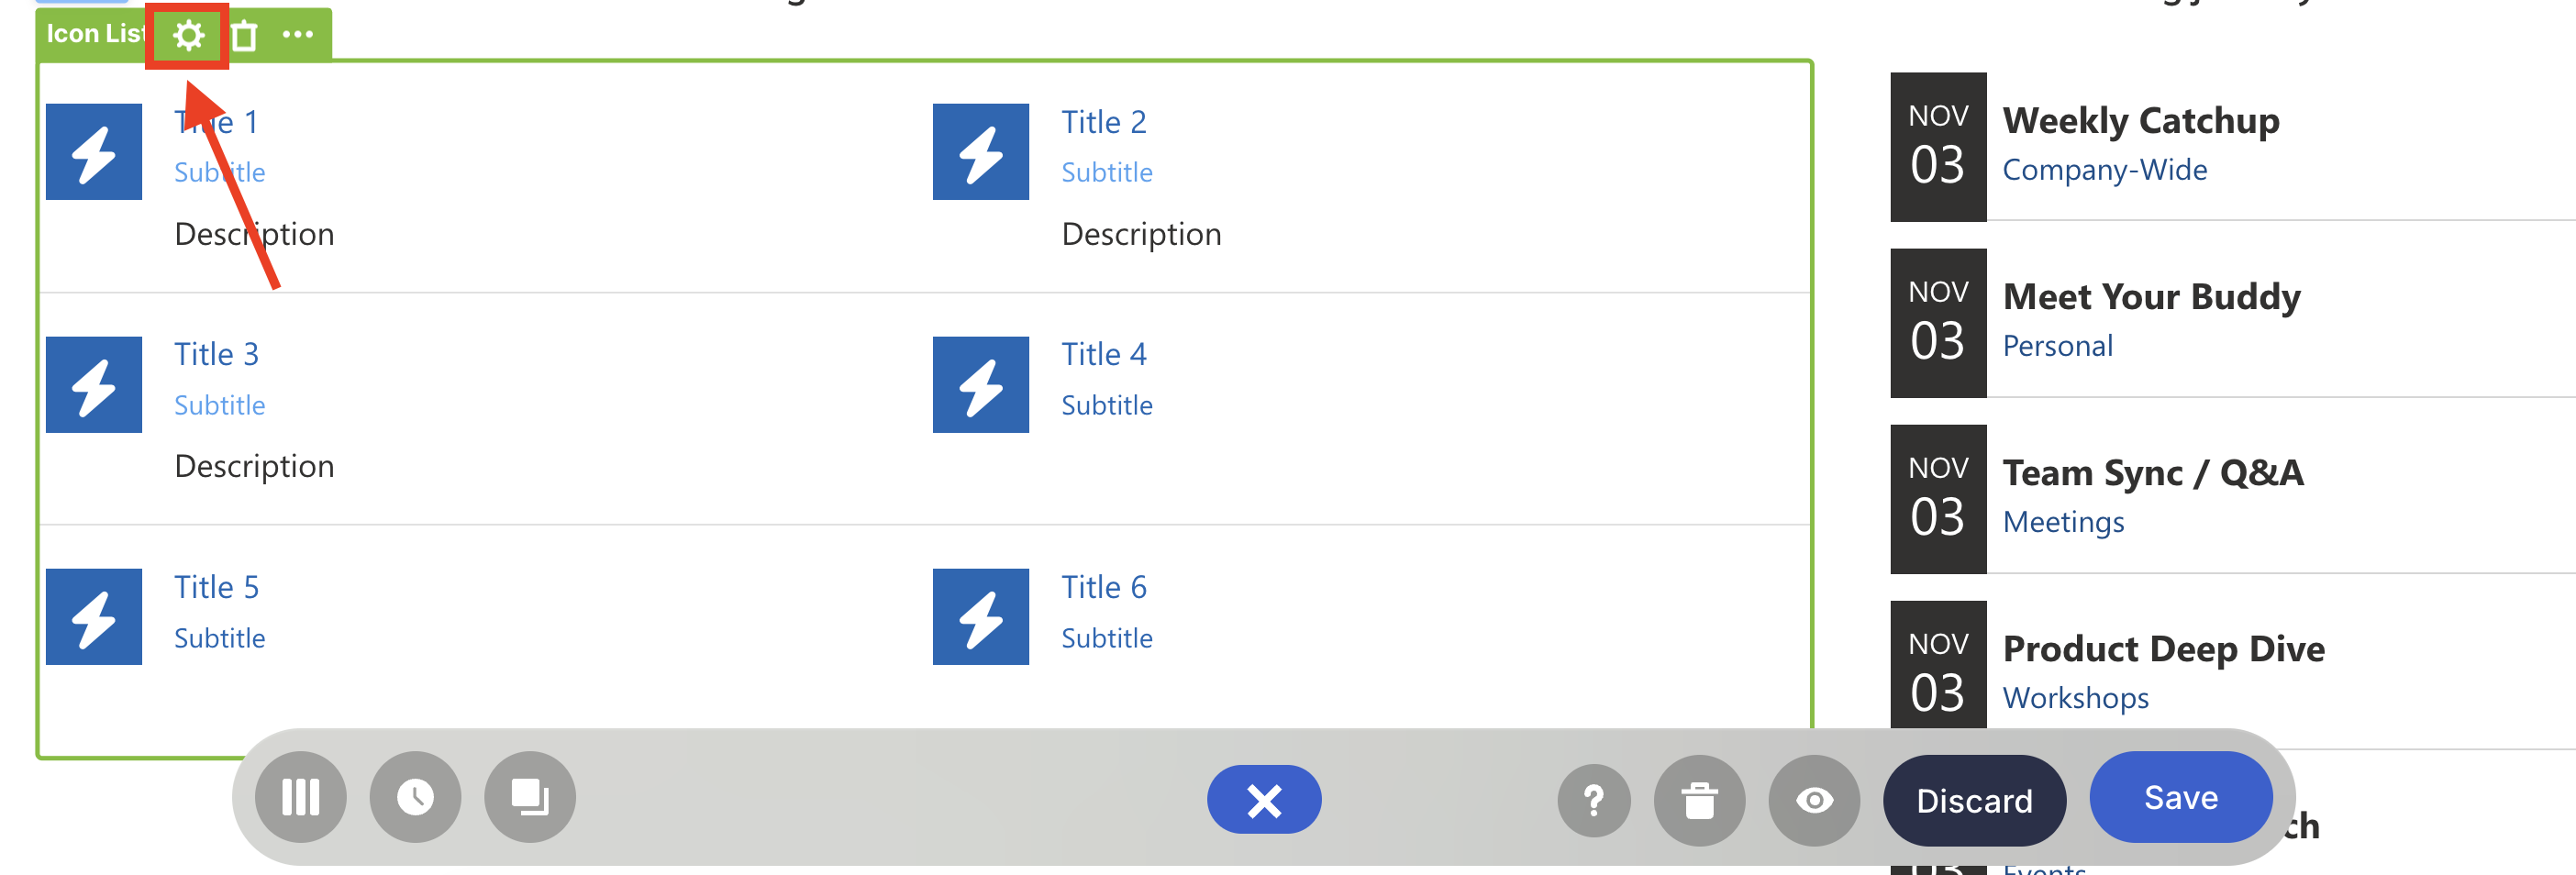
- Click the EasyPass tag of the Design Element you want to use to connect:

- Select the cogwheel icon:
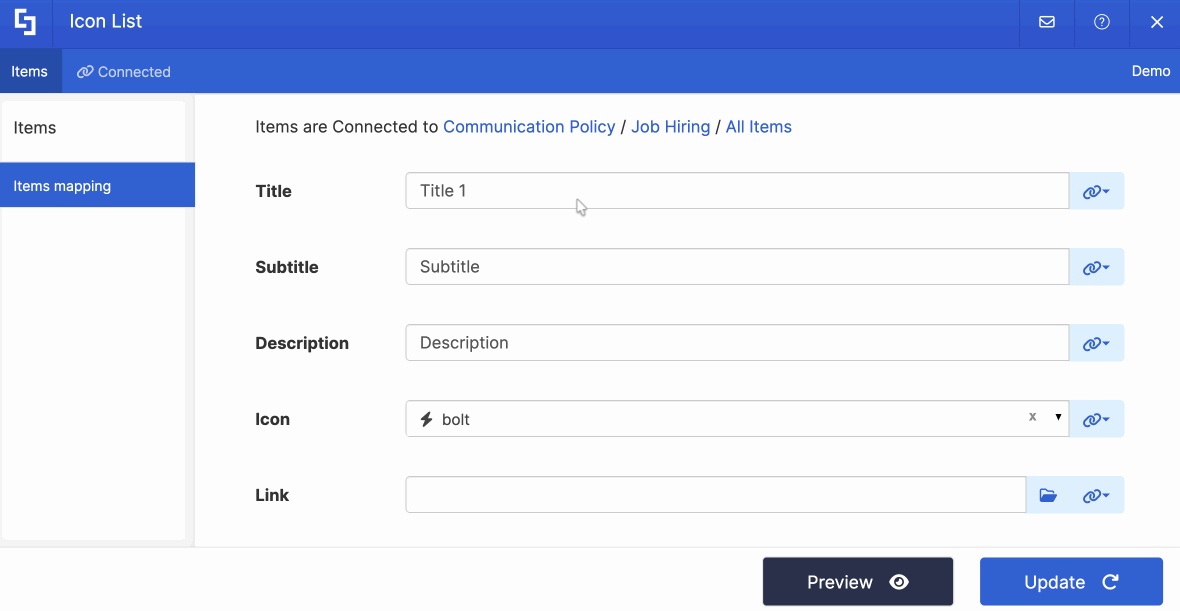
Step 3: Connect using the Current Site connection type
- Go to the Connect tab.
- Click Configure:

- Select Current Site.
- Click the List / Library drop-down and look for the name of your SharePoint List / Library / Calendar.
- If you have created a custom view, click the View drop-down to select your preferred view.
- (Optional) In the Items Limit field, write the maximum number of items you want to be displayed on your connected Design Element.
- Then, click Connect to establish the connection.
NOTEGo to Current Site Connection Features to learn more about the options you can modify.
Step 4: Map Items to display
- Go to the Items tab.
- Delete all default content:
- Click the link icon to choose the properties you want to display. You can map any property you prefer. Just take note that the properties you can map depend on the information in your SharePoint List / Library / Calendar.
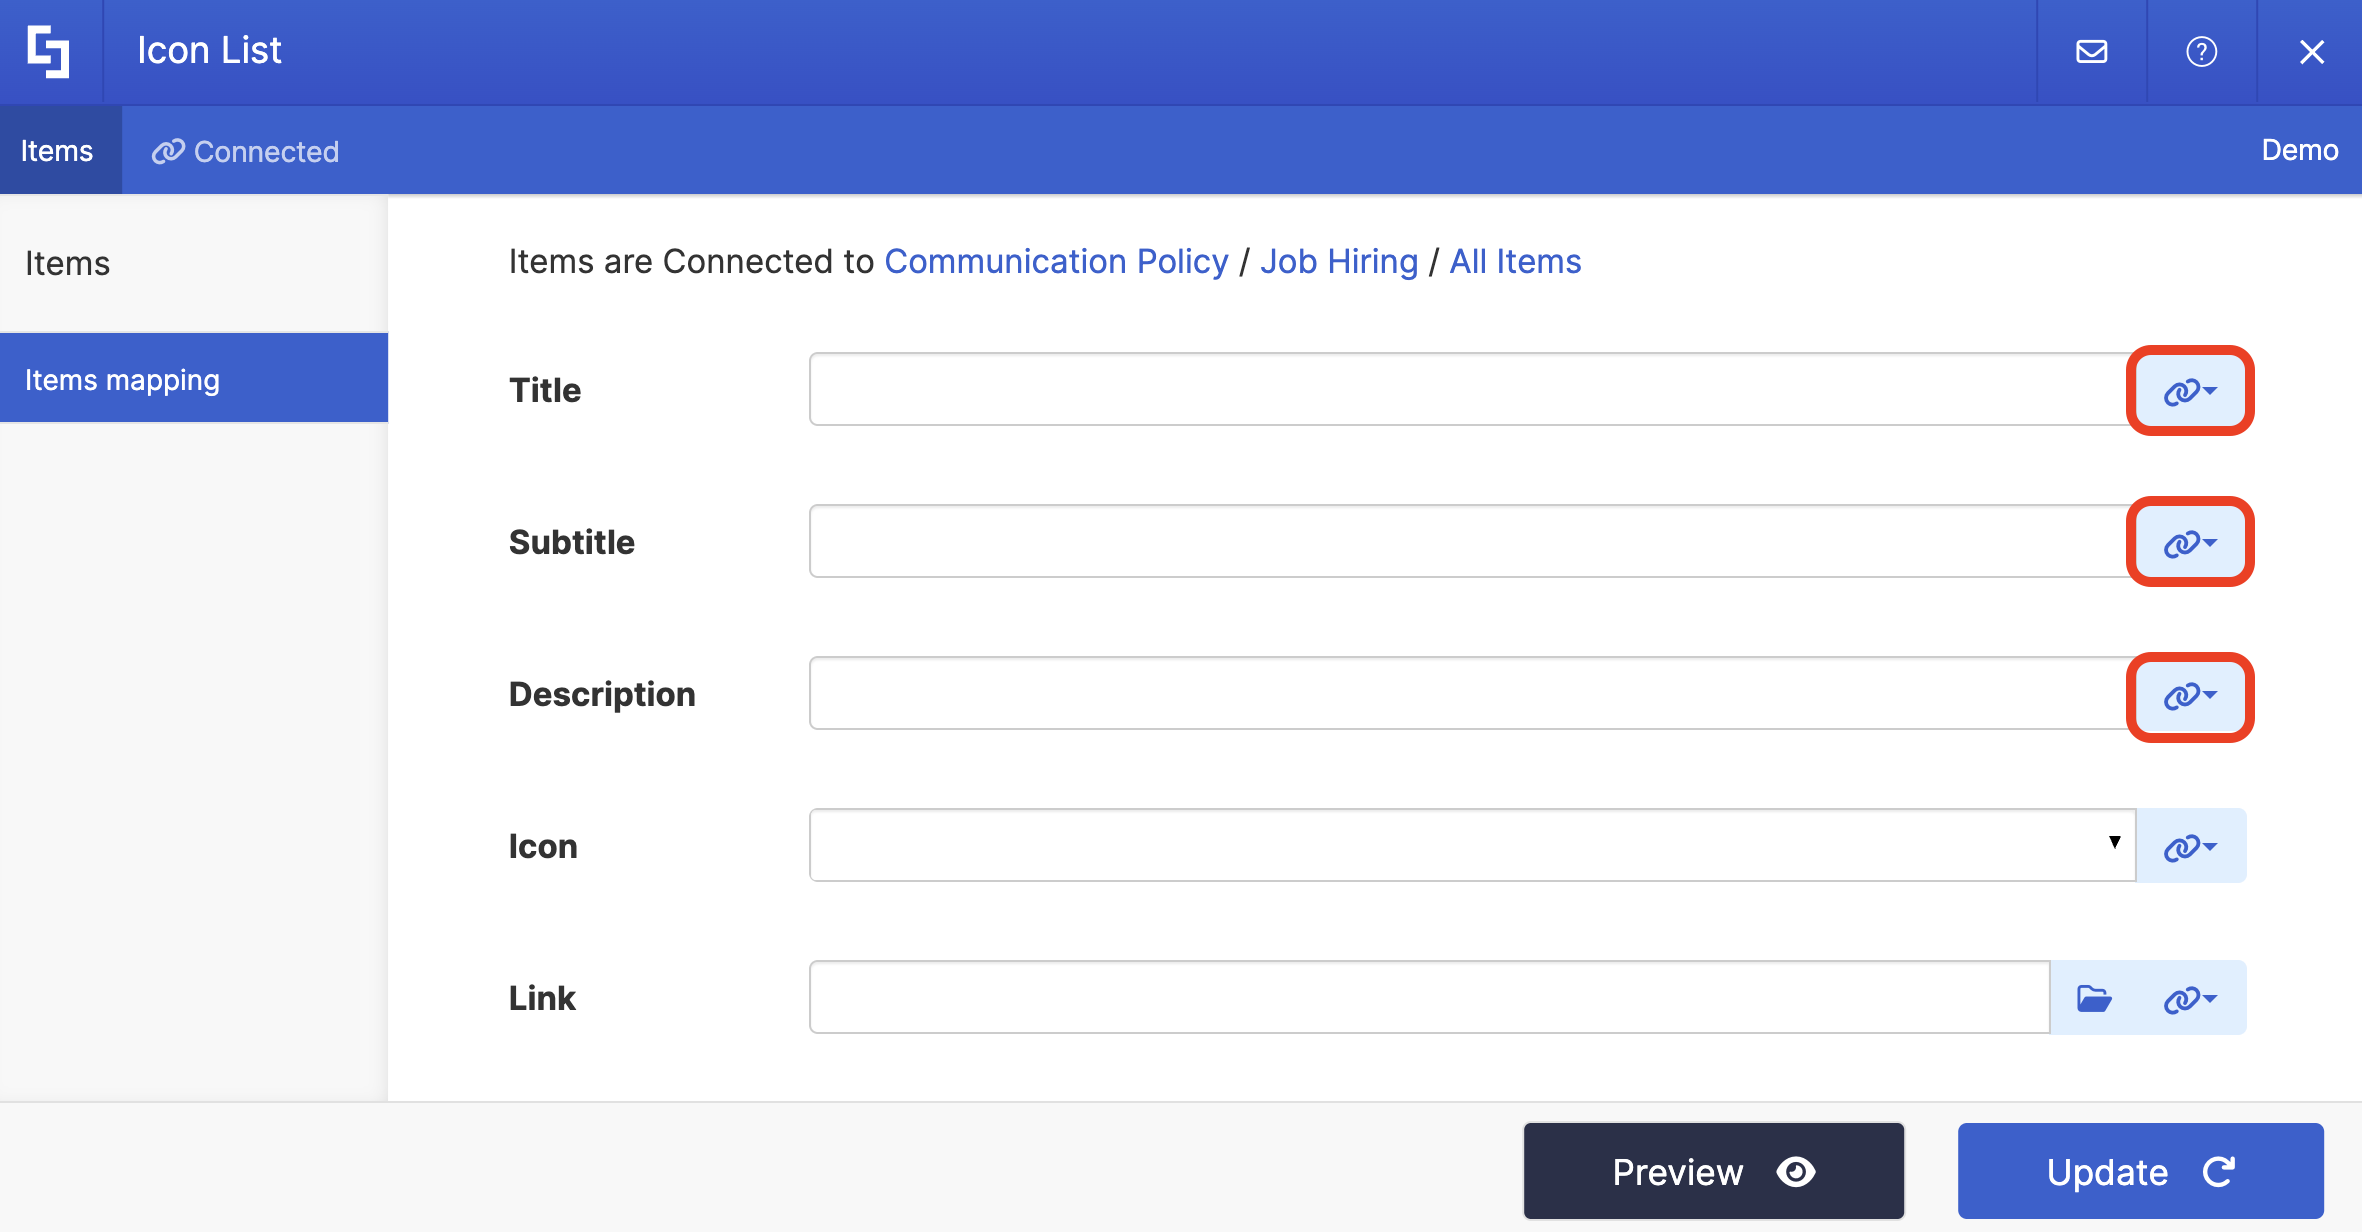
- Here’s an example of our mapped properties:
- #LinkTitle - shows the information inside our SharePoint List’s Title column.
- #Department - shows the information inside our SharePoint List’s Department column.
- #Description - shows the information inside our SharePoint List’s Description column.

NOTETo learn more about the Connect Feature and Items Mapping, check out Basic Tutorial: How to Establish Seamless SharePoint Connection with ShortPoint Connect.
Step 5: Update and Save
- Click Preview to see how the Design Element will look on your page.
- Once satisfied, click Update.
- Select the green checkmark.
- Then, click the eye icon to see how your page will look in real-time:

- Click Save to apply your changes:

Congratulations! You now know how to use the Current Site connection type. You can now use this connection type to seamlessly access and display your data in real time.
TIPHave lots of items on your connected Design Element? The Search & Filter Toolbar is the perfect tool for you! It allows you to find the information you need in seconds. Check out Getting Started: The Basics of the Search & Filter Toolbar to give it a try.

Current Site Connection Features
Now that you know how to use the Current Site connection to access your SharePoint data, let's dive into its key features:
 | List / Library | allows you to look for the name of the SharePoint List, Document Library, or SharePoint calendar you want to connect to. |
 | View | allows you to choose the name of the custom view you created for your SharePoint List, Document Library, or SharePoint calendar. |
 | Items Limit | allows you to set the maximum number of items to display. If this is left blank or is set to 0, all items will be shown. |
 | Convert HTML to Plain Text | when enabled, this option will convert all the HTML data to plain text. |
ADVANCED SETTINGS
 | Enable Advanced Settings | when enabled, advanced settings will be displayed. |
 | Custom headers | allows you to append custom header parameters using JavaScript. This option is only available when Enable Advanced Settings is turned on. Learn more about the Custom Headers function. |
 | Change Parameters | allows you to pass parameters to the URL with JavaScript. This option is only available when Enable Advanced Settings is turned on. Learn more about the Change Parameters function. |
 | Change Path | allows you to modify the Service URL Path using JavaScript. This option is only available when Enable Advanced Settings is turned on. Learn more about the Change Path function. |
 | Map Results | If your API doesn't return an array of result items (which ShortPoint expects), you can use this function to transform the data into the proper format for ShortPoint. This option is only available when Enable Advanced Settings is turned on. Learn more about the Map Results function. |
PERFORMANCE AND CACHING
 | Enable Partial Loading | This feature is enabled by default. It allows partial loading to activate automatically when the connection returns more than 20 results. Additional results will load as the user scrolls. Learn more about the Partial Loading function. |
 | Cache Options | allows you to choose from 3 caching options. Learn more about these caching options and how to improve ShortPoint performance on your SharePoint sites. It has the following options:
|
Practical Use Cases
The Current Site connection type shines in numerous real-world scenarios. Here are some ways organizations are putting it to work:
Employee Directory Display
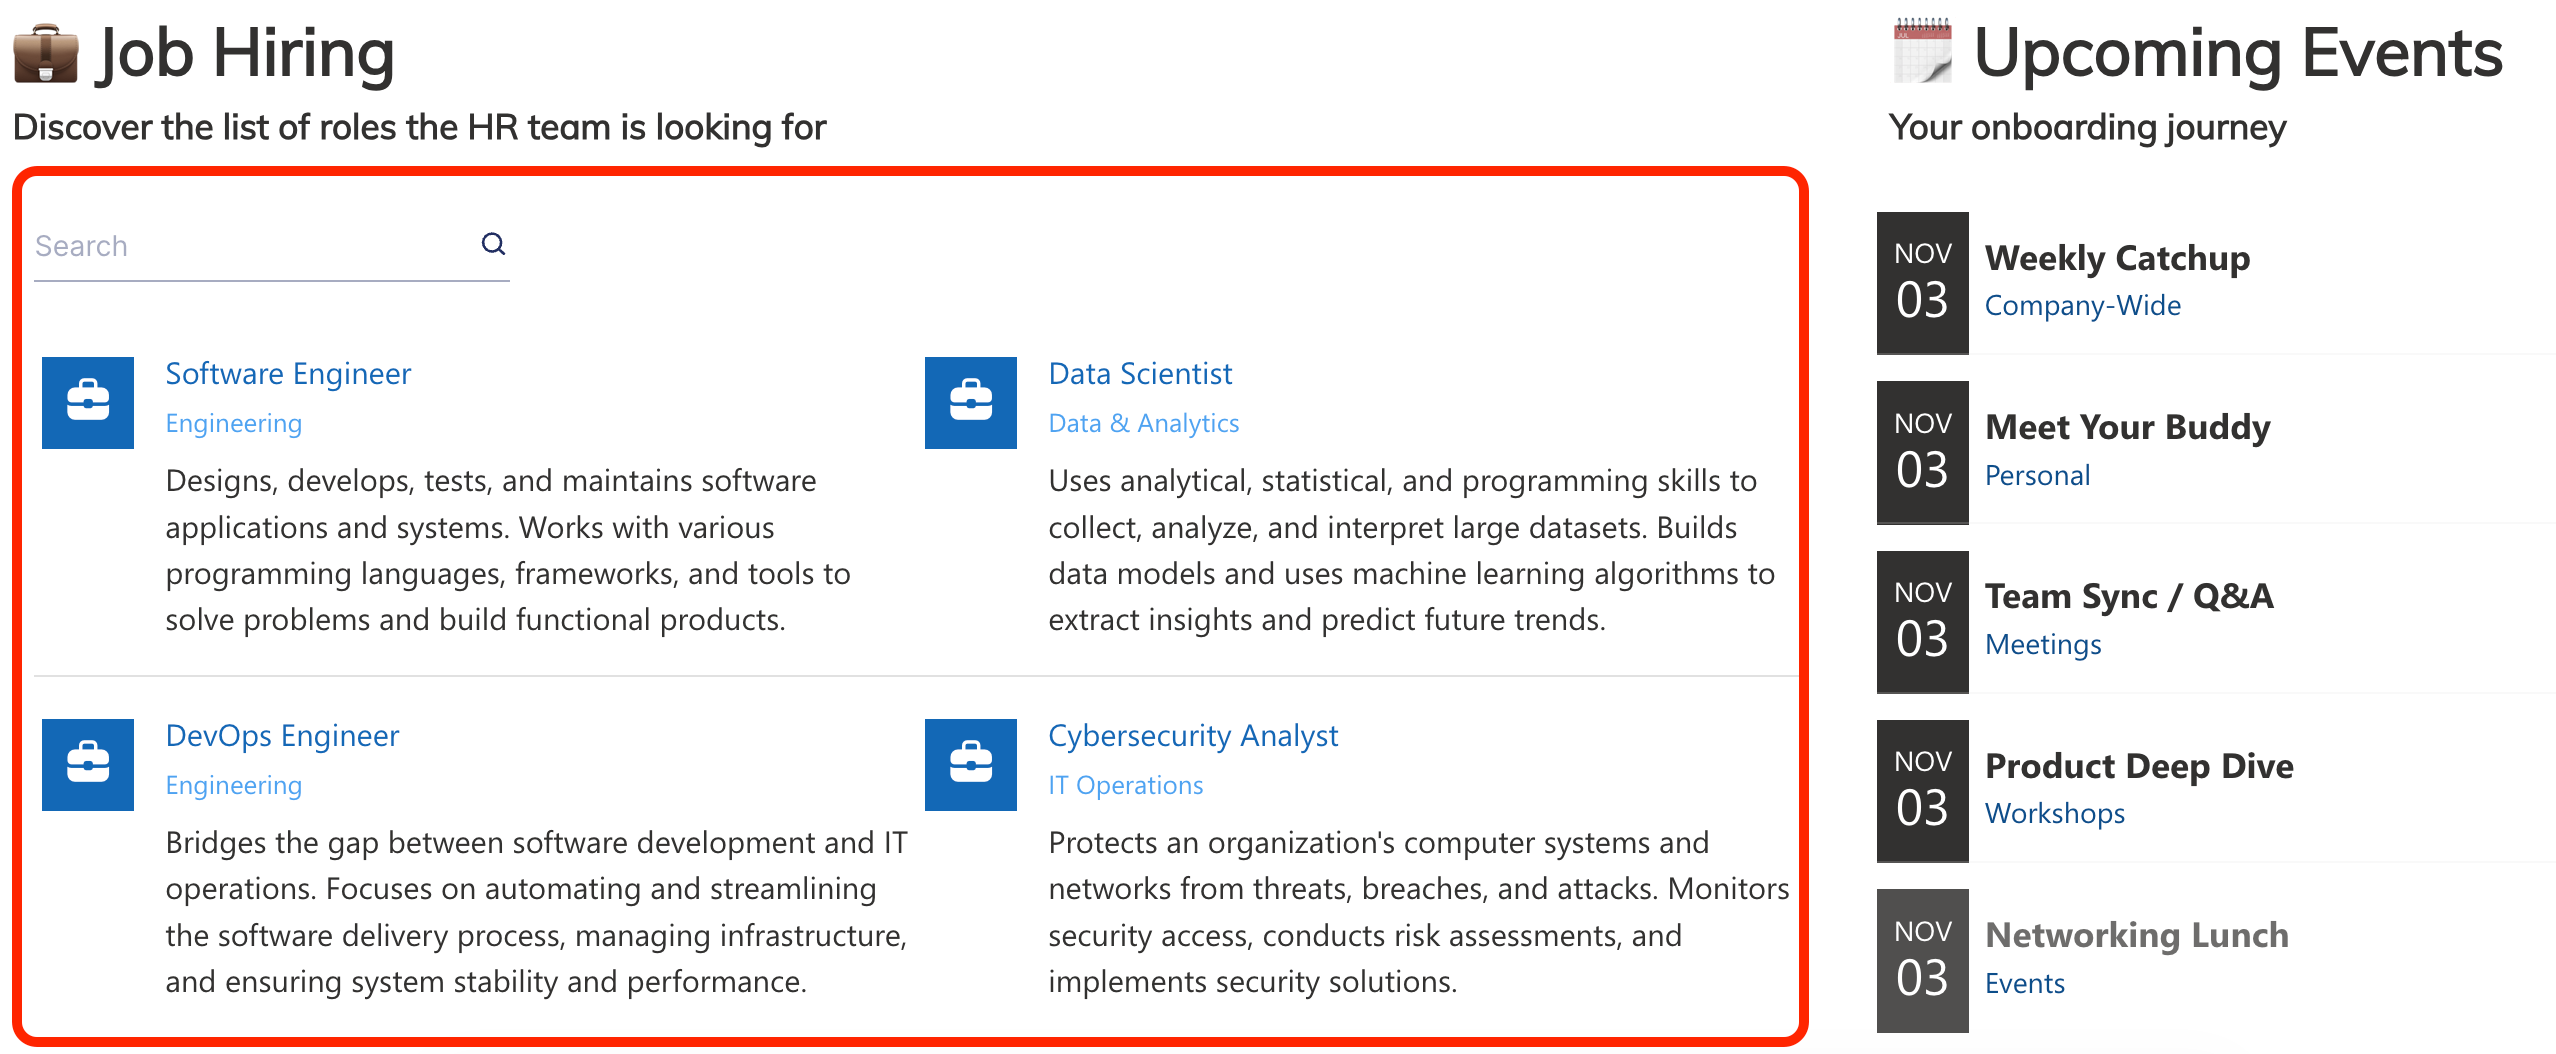
Do you have an existing staff list? The Current Site connection type gives you a perfect way to create an attractive, searchable employee directory on your intranet homepage. Simply connect your existing employee list to an Image List, like what we have below. And the best part? When you add a new team member or someone gets promoted, the directory updates automatically in real time to keep your site current and engaging.

Job Postings Board
Many organizations already use Current Site to display open positions on their careers page. Why not use it too?! Your HR team can manage job listings in a SharePoint list, and your page viewers can see them beautifully presented on your SharePoint site.
Document Libraries Showcase
Display your most important documents, policies, or resources directly on landing pages. Employees can access what they need without digging through folder structures, ensuring seamless access to files within your SharePoint page.
Event Calendars
Have tons of important events and meetings? You can easily pull events from your SharePoint calendar and present them in an engaging format on your homepage or department pages using the Current Site connection. With real-time updates on your page, your team will never miss any important schedule.

Share Important Announcements
Keep everyone in the loop by connecting to your SharePoint announcements list. You can link the list to the Ticker Design Element, for example, and you and your team can enjoy real-time updates on your SharePoint page.
Create Dynamic Content with the Current Site Connection
The Current Site connection type is all about making your life easier. It eliminates the tedious work of maintaining the same information in multiple places and ensures your pages always show the most current SharePoint data. Whether you're building an employee directory, showcasing documents, or creating a dynamic announcement list, this connection type has you covered.
Want to give this powerful connection a try? If you're already a ShortPoint Designer, simply follow the steps in our interactive tutorial, and you're all set. If you're new to ShortPoint, we've got you covered, too! You can explore all its features by starting a FREE 15-day trial with us. No strings attached! You can also have a one-on-one demo with our ShortPoint experts. They can show you what the Current Site connection has to offer and so much more.
Frequently Asked Questions
Do I need special permissions to use the Current Site connection?
You need to be a ShortPoint Designer with an active license, and you should have the latest version of ShortPoint SPFx installed on your SharePoint environment. You'll also need access to the SharePoint lists or libraries you want to connect to.
Can I control how many items are displayed?
Absolutely! When setting up the connection, you can indicate an item limit. If you don't want to limit items, leave it at 0 to show all items available in the view.
What if I have custom views set up in my SharePoint list?
Good news! You can select specific custom views when establishing the connection. This means you can filter and sort your SharePoint data, and that configuration carries over to your ShortPoint Design Element.
Do I have to use this connection type for every page?
Not at all. ShortPoint offers multiple SharePoint connection types. Use Current Site when your data lives on the same SharePoint site you're using. For data on other sites, consider the SharePoint Site URL or Other Sites connection types instead.
Will my SharePoint list properties be preserved?
Yes, your list, library, or calendar properties are preserved. Everything you set in SharePoint appears in ShortPoint. The connection respects your data structure and formatting.
Can I use this with any ShortPoint design element?
You can use any ShortPoint Design Element of your choice to establish the connection. Whether it's a Simple List, Image List, Accordion, or any other element, the connection works the same way.
What happens if someone deletes an item from the source list?
The connected ShortPoint element will automatically reflect that change. The deleted item will no longer appear in your design element once the cache refreshes.
Can I customize which fields from my list are displayed?
Yes! After establishing the connection, you'll map items to your design element fields. You get to choose which columns from your SharePoint list appear as headings, descriptions, images, links, and more.
How do I know if the connection is working?
When you successfully establish a connection, you'll see a green notification confirming it. You can also use the Preview feature to see how your connected element will look before publishing your page.
Do I need to reconnect every time I make changes to my SharePoint list?
No, that's the beauty of the connection! Once set up, it's a one-time configuration. Your ShortPoint element automatically pulls the latest SharePoint data from your list or library without any additional work from you.
How do I manage permissions when connecting to SharePoint data using the Current Site connection?
Permissions are managed within your SharePoint site. Ensure that your user account has the necessary access rights to the list item or document library you want to connect to. The connection respects existing permissions and will only display data you are authorized to view.
What happens if the source file is moved or renamed in SharePoint?
If the file name or location changes, the sharing link may break, and your connected ShortPoint element will not display updated data. To fix this, disconnect the connection and reconnect with the new destination file path or destination folder.
Can I connect to multiple SharePoint lists or libraries on the same page?
Yes, you can create multiple new connections using the Current Site connection type, each targeting different data sources within your SharePoint site.
Related articles:
- ShortPoint Connect: Basic Tutorial
- Connection Types: Getting started with SharePoint Site URL
- Connection Types: SharePoint Site URL
- Connection Types: Other Sites
- Connection Types: People in SharePoint Group
- Connection Types: People Search
- Connection Types: RSS Feeds
- Connection Types: REST API
- Connection Types: Current User
- Connection Types: Web Service (XML)
