 Try ShortPoint now
Before you start:
- We will use SAP Destination to connect with SharePoint 2013 On-Premise environment. If you want to know more about SAP Destinations, you can read the documentation here
- We are connecting to SharePoint 2013 On-Premise with Basic Authentication
- We are using REST\OData query to load content from SharePoint
ShortPoint can be used to show the data available on an external application, that you would like to show uniquely, you can configure ShortPoint Widget along with SAP Destination to read those data and present them in a beautiful way using ShortPoint elements.
Step 1: Connect with SharePoint On Premise 2013:
We need to create a new Destination to connect with SharePoint,
Open your Cloud Portal Cockpit > from the left panel Choose Destinations

Now from the right panel, click on "New Destination"

A form "Destination Configuration" will appear as follows

In this example we are connecting with SharePoint On-Premise website using REST query as Destination URL(_api/web/lists/GetByTitle('Announcements')/Items?$select=Id,Title,Body) with Basic Authentication. This query loads items from SharePoint list called Announcements, we also specified to return only Id, Title and Body fields for each item.

Step 2: Register the Connection on ShortPoint
Generate Config files
In order to use the destination in ShortPoint you have to register it in two config files. But to make things easy for you, we have created a simple page that will generate config files based on Destination Name.
You only need to specify the Destination name and the Connection name in the field Destination Connections. Connection name is a name user will see in Connect panel of ShortPoint Inserter.

When all connections are listed there, press Generate button.
Copy Config generated files
When files are generated, copy their content to corresponding files in SAP Web IDE.
You can find more information on Config Generator page.

Step 3: Redeploy the Widget
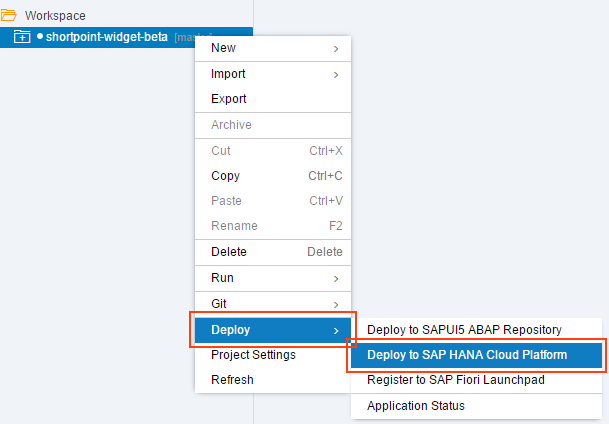
To Deploy the Widget, right click on folder shortpoint-widget-beta > Deploy > Deploy to SAP HANA Cloud Platform
Then the Dialog “Deploy Application to SAP HANA Cloud Platform” will appear, choose Deploy an existing application, and click Deploy

Step 4: Connect Tickers ShortPoint to Announcement SharePoint library
Open the blue Insert button

Search for "Tickers" and click on it

Go to the "Connect" Tab

Choose "Announcements" from the "Connection Type" drop down menu, and click "Connect"

Wait for few seconds, until connection is established, once the connection is done, a green info box will appear telling you that "ShortPoint is Connected to Announcements" as in the next image

Now get back to the "Items" tab

You will notice that next to each field now we have a "Link" button,
Because we will not add items one by one, instead, all the items will be coming from the connection that we have just done,
We will use this "Link" button to specify which metadata from the connection will be used for this field.

In our example, we want the "Title" from the Connection to be displayed as a Title for the "Ticker"

We have configured what data to be shown inside our Ticker from the SharePoint Connection,
Now let us update the settings for the ticker to make it look appealing.
Open the "Settings" tab

And update the following options, as in the next image:
- Title: "Breaking News"
- Style: "solid"
- Size: "medium"
- Color: "warning"

Click Insert, to add it to the Widget

Your Ticker is now inserted into the widget, and the link icon indicates that it is connected, and the rendered data will be coming from the connection itself

Hit the Save button

And you will see a nice golden ticker that shows data right from your SharePoint Server, how cool is that!

